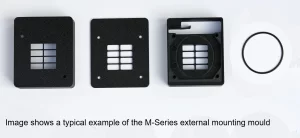
Installation Guide for M3M-COM Mould Set
The M3M-COM is a three-part mould set for mounting a Rosahl M-3M1R membrane dehumidifier on the outside of an enclosure. It includes an internal sealing ring.
Overview
When installed inside a sealed enclosure, the M-Series dehumidifier expels moisture through the membrane. Installation requires a cut-out in the enclosure wall where the membrane can be mounted to allow moisture removal. The process is silent, waterless, and maintenance-free.
However, for small or tightly packed enclosures, the membrane can be installed externally using a special mould. In this case, the M3M-COM enables the unit to draw moisture from inside the enclosure by redirecting the outflow path.
Important: Reversing power polarity does not reverse moisture flow. Doing so will damage the membrane. The moulds maintain correct orientation and function. When combined with a USB-C power adapter, it provides a simple, efficient solution for low-power dry storage.
These membrane kits are suitable for use with a wide range of sealed display and storage enclosures to protect sensitive and delicate equipment. They are also ideal for applications such as drying 3D printer filaments without needing desiccant.
Assembly & Mounting Instructions
1. Mounting Cover Components
The mounting kit consists of:
– Inner fixture – holds the membrane and USB-C power module.
– Outer cover – secures and protects the assembly.
– Back plate – optional for extra support on flexible enclosure walls.
See below for a full parts list
2. Marking and Preparing the Cut-out
- Position the inner fixture at the desired location and mark screw holes. It may be easier to hold it upside down.
2. Drill one hole first, temporarily bolt the fixture in place, then drill the remaining holes.
3. Use a 3.5 mm drill bit for mounting holes. The fixture’s holes are slightly oversized to allow for alignment.
4. Cut the membrane opening using one of the following methods:
– Rotary tool with a cutting disk.
– Manual method: Drill a ring of small holes and file the edges smooth.
Assembly & Installing Components
3. Installing Components
Click here to see our new video on assembling a kit
Caution: Do not touch the black (internal) or grey (external) membrane surfaces. Wear gloves to prevent damage or contamination.
4. Final Mounting
1. Position the assembled unit over the enclosure cut-out.
2. Use the original gasket between the fixture and enclosure wall.
3. Fix using the nuts and bolts or M-5PKT kit.
4. If the wall is thin or flexible, use the spare back plate inside the enclosure for a firm seal.
Parts Supplied
– M3M-COM inner + outer mounting fixture
– Rubber sealing ring
– Back plate option
Additional Parts Needed
– Pre-wired USB-power supply VRS-330
– M-3M1R membrane dehumidifier and gasket
– Fixing screw kit M-5PKT
Notes
– Ensure all electrical connections are correct before final assembly.
– Always use the sealing ring to prevent moisture leakage.
– Confirm that the gasket is fully compressed for an airtight seal.
– Illustrations are for guidance only.
– Version 1.C1

Westside-International Ltd
Boston House, Downsview Road, Wantage, Oxfordshire, OX12 9FF. UK


